Close-up view of the servo assembly that controls the release of suction. Note the small hole in the tubing that is used to allow air to pass back into the system.
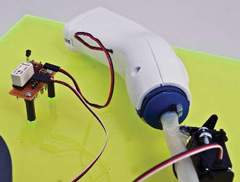
The suction control system uses a Reynolds Handi- Vac, a relay board and the suction release servo.
THE BALLOON AND THE COFFEE
To construct the gripper I first purchased a package of 100 10-in. party balloons from Amazon.com. They are manufactured by BSA and come in a rich assortment of colors (according to the package). I decided to go with Royal Blue for my gripper. For the coffee I chose Stop & Shop (a local food chain) Original Roast Ground Coffee that cost $2.79 for 13 oz. It has a rich aroma and locks up like a dream when a vacuum is applied. And for what its worth it does not produce a bad cup of coffee either.
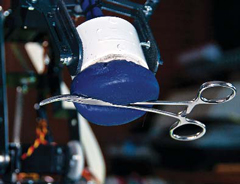
BalloonBot’s grip is adaptive and strong. It has no problems picking up forceps.
The amount of coffee you place inside the balloon is somewhat critical. If you place too much coffee in the balloon it will become too rigid and the robotic arm will not have enough power to push down and envelop the object to be grasped. Too little coffee and the grounds will not lock up with enough force to hold the object. For my configuration, using the SG6-UT, I found that 1/2 cup of coffee worked well. The easiest way to get the coffee into the balloon is with a small funnel. Place the end of the funnel in the balloon and spoon in the coffee a teaspoon at a time. Lightly tap the funnel and the coffee grounds will flow into the balloon with ease. But no matter how careful you are, expect to have coffee grounds spill all over the place. To stretch the balloon and give it more room and flexibility I inflated/deflated it before loading the coffee.
GRIPPER MOUNTING
The mounting of the balloon gripper to the SG6-UT proved to be reasonably simple. I used a PVC 1 1/2-in. straight coupling. Inside the bottom of the coupling I glued a 1/8-in. length of 1 1/2-in. PVC pipe. The balloon slips through the coupling with the bottom of the balloon protruding out the bottom about two inches. This leaves the rest of the balloon and some of the coffee still up inside the coupling. When suction is applied the coffee locks up and the grips the object to be picked up and also the 1/8- in. piece of pipe inside the coupling. This secures the balloon and the object while it is being lifted. The whole assembly is attached to the arm’s existing gripper using two 1/2-in. 4-40 machine screws that pass through the convenient parallel slots cut into each of the paddles of the gripper. Since the SG6��s gripper is effectively locked in place I disconnected its servo from the controller.
THE VACUUM SYSTEM
To create the strong vacuum needed for the gripper I choose the Reynolds Handi-Vac for the source of suction. It is part of Reynolds Vacuum Food Storage System. Like the balloons, I bought it through Amazon.com and for under $10. From the numerous negative comments on the Amazon page I would guess that as a Vacuum Food Storage System it could leave much to be desired. Fortunately as a suction source for my BalloonBot it worked flawlessly. I made several modifications to the pump starting with the removal of the freezer bag attachment chamber to expose the suction input port. Over the port I placed a small piece of scotch tape with five tiny holes poked into it (using a sewing pin). This little homemade screen prevents any coffee grounds from being sucked into the delicate pump mechanism. Next I opened the pump housing and attached two wires across the built-in power switch. The pump is powered by 6 AA batteries. I drilled a hole in the case so that the wires could pass out of the pump and connect to my controller. Using one of the digital I/O ports on the ServoCenter and a 5 volt DPDT DIP relay I can turn on and off the pump under programmatic control. The optimal time for the suction pump to run and ensure a secure grasp is seven seconds. The balloon is connected to the suction pump with a 24-in. length of White Silicone Tubing, with 1/2-in. ID, 5/8-in. OD, and a 1/16-in. wall. I also bought this on Amazon.com. This tubing is very flexible and can easily hold the vacuum generated by the pump. I used tie-wraps at strategic locations to connect the tubing to the pump and balloon as well as hold it in place along the spine of the SG6-UT arm.The biggest challenge of the entire project was to come up with a mechanism that would release the suction when you wanted the gripper to release the object. To solve the problem I cut a small 1/16-in. hole in the tubing about an inch from the pump. I installed a Parallax Standard Servo next to and parallel to the hole. I glued a small ��cap�� (tube cross section, see photo) made from a piece of the tubing to one of the servo horns. I extended the adjacent servo horn by about an inch as well. When suction is being applied the servo holds the cap over the hole. To release the suction the servo spins counterclockwise which disengages the cap and pushes the tube up with the extended servo horn. The act of pushing the tube up elongates the small 1/16-in. hole and releases the suction. All the components for BalloonBot including the SG6-UT, the Yost ServoCenter, and the vacuum system were all mounted to a 12 x 24in. sheet of florescent green Plexiglas. Why is the Plexiglas florescent green? It looks cool and I had a piece lying around saving a trip to Home Depot.
SOFTWARE
The Yost ServoCenter is connected to my PC via a USB cable. Like most serial interfaces the ServoCenter uses the FTDI chip and driver to create a virtual serial port. You can install the ServoCenter Control Panel Utility to directly communicate with the ServoCenter controller board through the virtual serial port. The Control Utility has an easy to use user interface that allows you to control and configure each individual servo port, configure digital and analog ports, as well as program the built in Sequencer. For my project I choose to communicate directly with the ServoCenter from a C# program using the Win32 DLL and .NET class wrapper. The application I wrote (called the BalloonBot Studio) allows the user to manually position the SG6-UT arm as well as move it to several preprogrammed positions for object pickup and release. I also implemented a complete pickup and release sequence to aid in testing the gripper with a variety of objects.
To control the SG6-UT arm’s six servos and the vacuum pump (more on the pump later) I used the powerful Yost Engineering ServoCenter Mini embedded servo controller. This controller allows RC servo motors to be controlled from any USB port. The ServoCenter can control the seek position and speed of up to sixteen connected servos — independently and simultaneously, with simple serial commands. You can also chain ServoCenters together to control up to 256 RC servos, with completely independent movement, from only one USB port. Independent control allows you to move one servo to a position slowly, while another is moving to a different position at a faster speed, and group moves allow you to synchronize multiple servos easily. The ServoCenter controller provides a built-in Sequencer / BASIC Interpreter called SC-BASIC which allows the sequencer to run independently on the board itself. Sequencer programs are stored in non-volatile EEPROM memory that retains the program even when the unit is reset or powered off, eliminating the need for a PC or other external command device.